So, I ended up with a Sony DSC H1 thanks to the recent promotion and their free gifts (512mb memory stick pro, extra batteries and S$20 accessories voucher - I knew I will end up with a free gifts loaded camera). The complexity of the cameras in the sheer number of buttons (16 buttons and 3 dials) required to access all the functions of the DSC H1 almost overwhelmed me. But thanks to my experience with the P3, I had no problem shooting photos in auto mode as they work almost the same.
So here I am, taking my free time to slowly explore the various functions of the H1 bit by bit and documenting those findings in this multi-part review. (I don't know when I will stop).
Note, most photos are resized and compressed to save time uploading so the image quality seen here may suffer a bit.
Image quality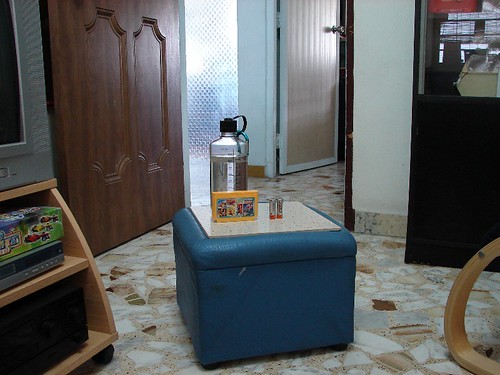
Program mode at 5 megapixels, resized, wide photo (no zoom) and compressed. Objects about 1m from the camera.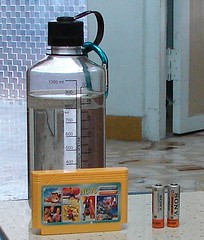
Same picture as above, zoom in view of object, click on image for original size, compressed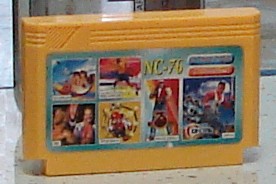
Same picture as first one, zoom in view of game cartridge, original size, compressed
The overall image quality is good. The camera was able to pick out the details of the cartridge quite well as I could make out the type of game it offered , though the pictures on the cartridge were not very clear.
12X Optical Zoom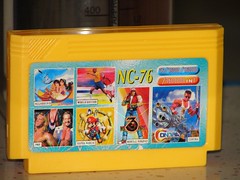
Same cartridge as above, taken at same position, same mode but with 12X optical zoom, resized.
Same picture as above, zoom in view of object, click on image for original size, compressed
It's amazing what 12X optical zoom will do to your image. The graphics on the cartridge is now clearly visible along with the fine prints. In fact, the camera managed to catch those glittering line design on the cartridge. In fact, the poor printing quality of the cartridge could be seen on the image when zoom in to the normal size.
Also, the lenses move within the camera while zooming, so the lense barrel would not get longer as you zoom, thank goodness! Ladies, beware, there's no hiding your pimples and black heads from this mean beast.
Focusing
Toothpicks, focus using flexible spot AF. Picture is under exposure as flash is disabled due to close proximity to objects near the flash (a few cm away). The background toothpick is focus but the foreground one is blur.
Toothpicks, focus using multi point AF in aperture priority to focus on both the foreground and background toothpicks.
Toothpicks, focus using center AF in macro mode. The foreground toothpick is focus while the background is out of focus here.
The DSC H1 offers plenty of ways to change how you want your picture to look like for that added touch. Here, I'm experimenting the differences in getting the camera to focus on different parts of the picture. There are 4 ways to tell H1 how you want to focus on you picture, including a manual focus where you specify the distance from the camera. In manual focus, the camera zoom into the centre for you to set the distance accurately. I have to admit that I face some degree of difficulty using the flexible spot AF to focus on the first image. Perhaps the background toothpick was not sufficiently small or that the foreground toothpick were affecting the AF.
Tagged: singapore digital camera dsc h1
Subscribe to:
Post Comments (Atom)
About Me
Labels
- Blog - Essays (31)
- Blog - Photography (17)
- Blog - Physics (15)
- Blog - Random Rants (87)
- Blog - Teaching (29)
- Blog - Videos (9)
- Camera - Fuji F11 (7)
- Camera - K700i (3)
- Camera - K810i (2)
- Camera - Sony A100 (161)
- Camera - Sony A700 (45)
- Camera - Sony H1 (29)
- Camera - Sony T100 (1)
- Lens - Carl Zeiss 16-80mm f3.5-4.5 (24)
- Lens - KM 28-75mm f2.8 (98)
- Lens - Minolta 100mm f2.8 macro (5)
- Lens - Minolta 50mm f1.7 (18)
- Lens - Minolta 70-210mm f4 (13)
- Lens - Minolta 75-300mm f4.5-5.6 (42)
- Lens - Sigma 70-300 f4-5.6 (2)
- Lens - Sony 18-250mm f3.5-6.3 (3)
- Lens - Sony 18-70mm f3.5-5.6 (47)
- Lens - Sony 50mm f1.4 (1)
- Lens - Sony 70-200 f2.8 SSM G (1)
- Lens - Tamron 70-210mm f2.8 (39)
- Lens - Zeiss Planar T* 85mm f1.4 ZA (1)
- Photo - Animals (6)
- Photo - Birds (5)
- Photo - Events (23)
- Photo - Flowers (16)
- Photo - Kids (16)
- Photo - Macro (6)
- Photo - Others (7)
- Photo - Places (18)
- Photo - School (40)
- Photo - Wedding (2)
- ROM (1)
Blog Archive
-
September 2010 (1)
June 2010 (1)
May 2010 (3)
March 2010 (4)
February 2010 (3)
January 2010 (3)
December 2009 (3)
November 2009 (3)
October 2009 (4)
September 2009 (7)
August 2009 (6)
July 2009 (7)
June 2009 (4)
May 2009 (9)
April 2009 (7)
March 2009 (9)
February 2009 (6)
January 2009 (7)
December 2008 (13)
November 2008 (13)
October 2008 (20)
September 2008 (11)
August 2008 (11)
July 2008 (17)
June 2008 (10)
May 2008 (9)
April 2008 (14)
March 2008 (15)
February 2008 (16)
January 2008 (19)
December 2007 (11)
November 2007 (16)
October 2007 (20)
September 2007 (17)
August 2007 (18)
July 2007 (17)
June 2007 (16)
May 2007 (12)
April 2007 (23)
March 2007 (20)
February 2007 (16)
January 2007 (16)
December 2006 (18)
November 2006 (21)
October 2006 (25)
September 2006 (26)
August 2006 (22)
July 2006 (27)
June 2006 (28)
May 2006 (25)
April 2006 (11)
March 2006 (13)
February 2006 (19)
January 2006 (22)
December 2005 (25)
November 2005 (12)
October 2005 (1)
August 2005 (1)
July 2005 (10)
June 2005 (20)
May 2005 (33)
April 2005 (6)
March 2005 (9)
February 2005 (4)
December 2004 (2)
Tagboard
Photos
www.flickr.com
This is a Flickr badge showing public photos from picturemastermind. Make your own badge here.
Counters


Copyrights
For Text and Articles

This work is licensed under a Creative Commons Attribution-NonCommercial-ShareAlike 2.5 License.
For Original Photos and Videos
This work is licensed under a Creative Commons Attribution-NonCommercial-NoDerivs 2.5 License.
This work is licensed under a Creative Commons Attribution-NonCommercial-ShareAlike 2.5 License.
For Original Photos and Videos
This work is licensed under a Creative Commons Attribution-NonCommercial-NoDerivs 2.5 License.